
Karen gave us a great demonstration of how to make these beaded boxes. This set of 3 was made by her friend Lindi.

This is the box of samples that Karen brought for show.
You'll find the supply list in the previous post.

The instructions for this project come from this book : Getting Started with Seed Beads by Dustin Wedekind. This is the "Curiously Beaded Tin" on page 37.
Karen's advice :
Pre-strung beads make the work go faster.
Or you can use a bead-stringer tool.
There is no substitute for the Terrifically Tacky Tape. Other 2-sided tapes do not work as well. Save the orange backing to keep the TTT from picking up anything other than your beads. You can save the orange stuff on release paper so that you can get it off and use it where you need it.
Big-eye needles are great for using pre-strung beads.
Work on a tray to keep the beads contained.
Use a wooden skewer to move and place the beads.
Do not force the beads. Too many beads will bulge--they have no place else to go.

6-pound test "Fireline" fishing line is available at Fleet Farm for much less than you'd pay in the beading stores.
Here are some photos of the process :

First, string a stop bead.

I was really surprised how quickly the stringing went with the pre-strung beads. Karen used a big-eye needle and easily shuttled the pre-strung beads from their "native" string onto her Fire Wire.

This is an example of a pre-beaded piece (Peyote stitch?) that she planned to use as a focal point in this box. Here it is stuck in place by the TTT. See--they really are Altoids tins underneath!

Here, you can see more of the beads strung along the edge. You have to be careful to avoid the hinge areas, otherwise, the boxes won't open and close properly. She used dragon tears as focal points above. She will run the seed beads in strings around the dragon tears ...

Here's an example of the encircled dragon tears -- kind of like a Zen Garden!
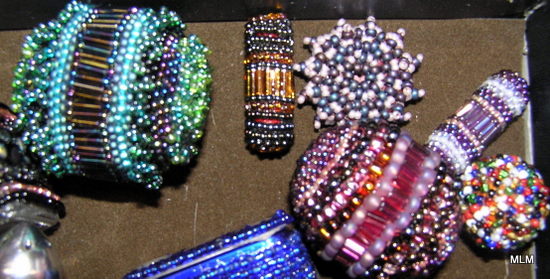
Karen has also been beading big wooden beads, as shown above. These are called "Belted Bricky Balls." The Confetti bead in the lower right corner of the picture was inspired by a method in a book called The Art of Beaded Beads by Jean Campbell.
An Altoids box takes a full 8 hours to cover. Once it's covered, you can brush the top of the beaded box with ModgePodge or a clear glaze to secure everything. You can also cut felt or ultra-suede for the bottoms of the tins.
Once you get started, you won't want to stop! Karen says this is addicting!

One of Karen's beaded jar lids. The same general method works on jar lids. TTT is the key!

More beaded lids. Gorgeous!

Yes, that's a set of salt and pepper shakers!


