Saturday, January 29, 2011

January Show & Share


Lynda's latest weaving. This is still a work-in-progress. She is contemplating how to hang it so that people can appreciate it from all sides.

Hanging by a Thread Studio

Karen has started posting to her Mixed Media blog.
Visit her, and leave comments! You'll also find a link at the right side of the CinC Blog.

Both Karen and Michele are participating in The Sketchbook Challenge. You can too! The January these is : Highly Prized.
See some of Karen's January entries here.
See some of Michele's entries here, here, and here.
There's also a Flickr Group devoted to the work participants post in The Sketchbook Challenge. In the first month, there are over 1,200 pictures!

Michele brought some new snow dyes to share:

Detail snow dye Kilt Green.


A piece thrown into the catch basin. Dyes used : black, wine, havanna brown, black cherry.


Detail of snow dye with Havanna Brown and black cherry on mercerized cotton.


Snow Dye with New Black and Wine on Mercerized on mercerized cotton.

Books of Note (Any of these would be great topics for future CinC Meetings!):


Confetti Naturescapes by Noriko Endo


Inspired to Quilt by Melanie Testa


Totally Tangled : Zentangle and Beyond
by Sandy Steen Bartholomew


Zentangle Basics by Suzanne McNeil

January Demo : Karen's Exquisitely Beaded Boxes


Karen gave us a great demonstration of how to make these beaded boxes. This set of 3 was made by her friend Lindi.


This is the box of samples that Karen brought for show.

You'll find the supply list in the previous post.


The instructions for this project come from this book : Getting Started with Seed Beads by Dustin Wedekind. This is the "Curiously Beaded Tin" on page 37.

Karen's advice :
Pre-strung beads make the work go faster.
Or you can use a bead-stringer tool.
There is no substitute for the Terrifically Tacky Tape. Other 2-sided tapes do not work as well. Save the orange backing to keep the TTT from picking up anything other than your beads. You can save the orange stuff on release paper so that you can get it off and use it where you need it.
Big-eye needles are great for using pre-strung beads.
Work on a tray to keep the beads contained.
Use a wooden skewer to move and place the beads.
Do not force the beads. Too many beads will bulge--they have no place else to go.


6-pound test "Fireline" fishing line is available at Fleet Farm for much less than you'd pay in the beading stores.

Here are some photos of the process :


First, string a stop bead.


I was really surprised how quickly the stringing went with the pre-strung beads. Karen used a big-eye needle and easily shuttled the pre-strung beads from their "native" string onto her Fire Wire.


This is an example of a pre-beaded piece (Peyote stitch?) that she planned to use as a focal point in this box. Here it is stuck in place by the TTT. See--they really are Altoids tins underneath!


Here, you can see more of the beads strung along the edge. You have to be careful to avoid the hinge areas, otherwise, the boxes won't open and close properly. She used dragon tears as focal points above. She will run the seed beads in strings around the dragon tears ...


Here's an example of the encircled dragon tears -- kind of like a Zen Garden!


Karen has also been beading big wooden beads, as shown above. These are called "Belted Bricky Balls." The Confetti bead in the lower right corner of the picture was inspired by a method in a book called The Art of Beaded Beads by Jean Campbell.

An Altoids box takes a full 8 hours to cover. Once it's covered, you can brush the top of the beaded box with ModgePodge or a clear glaze to secure everything. You can also cut felt or ultra-suede for the bottoms of the tins.

Once you get started, you won't want to stop! Karen says this is addicting!


One of Karen's beaded jar lids. The same general method works on jar lids. TTT is the key!


More beaded lids. Gorgeous!


Yes, that's a set of salt and pepper shakers!

Snippets : January 2011 Newsletter


Just a reminder that this Thursday is our meeting at 6:30 at the Menasha Public Library. We will be discussing

  • whether or not we want to do a group challenge and if so what it will be
  • Should we plan a show for 2011
  • Regular Sharing (bring everything you’ve been working on since October
  • What else?

Thursday evening is also my night to demonstrate the tin beaded boxes and beaded beads. Below is a list of things that you will need for the box so that you can bring them a long if you want and I’ll get you started that night.

First you need a tin covered with Terrifically Tacky Tape. That is a name brand tape and nothing else is sticky enough. It is available only at Hobby Lobby and Michaels’s. I will briefly go over covering the tin, but if you want to get started beading Thursday night, bring your tin covered. Make sure you leave the protective (pink) tape on the tin so that it doesn’t stick to everything.

You will also need:

  • An exacto knife
  • Beading Needle (Easy Eye beading needles make this project a snap)
  • Seed Beads (strung if you have them)
  • Beading Thread
  • Focal Point Beads, Shank Buttons (you’ll need to cut off the shank), or charms
  • Bamboo skewer or stiletto

Karen

Tuesday, January 04, 2011

December Newsletter

SNIPPETS from Conversation in Cloth

Meetings are held on the last Thursday of the Month at the Menasha Public Library at 6:30 PM
December 16, 2010

Members Present: Betty, Lynda, Joanne, Sandy, Karen, Michele, & Lois

White Elephant Holiday Party
We gathered at El Azteca in Appleton and had quite a lot of fun. As always the White Elephants are a hit. Everybody got one and I think a few will be back next year. We didn’t discuss much business, but we did discuss a donation to the Menasha Public Library and whether or not we will be able to continue meeting there in 2011. As of January we will still be at the library.

Dues are due!
2011 dues are due at the March meeting. It’s $5 for e-mail newsletters and $10 for snail mail newsletters.

2011 Challenge Project
If you recall we discussed three alternatives for a group challenge.
 Color Chip Design
 Continuous Line
 Fractured Photo
No matter which we choose, when put together, each finished piece will demonstrate our differences and our unity as a group. Examples of the formats can be viewed on the CiC Yahoo group website under photos. Check for the names listed above. This will be part of January’s agenda.

Treasurer’s Report
As of December 31, 2010 the cash balance is as follows:
Beginning Balance $164.78
Expenditures: $ 0.00
Total $589.78
Revenue:
2011 Dues rec’d to date $ 35.00
Balance $224.78

2010 Future programs
January 27 – Karen will demonstrate how to get started on the beaded tins (if the weather allows a trip from Green Bay to Menasha).
February 24 – Michelle will bring the Maria Elkins DVD and her samples so we can learn the monochromatic portrait technique that she showed us back in September.
March 25 – Joanne will demonstrate a new technique that she learned for dying silk scarves.

Sunday, November 14, 2010

Threadpainting (free-motion embroidery) Workshops with Karla Spinks


The members of CinC, with a few guests. We were at Julie's Sewing Center in Appleton, WI.

Back Row : ?? , Karla Spinks (Teacher), Lois, JoAnne, Pat
Middle Row : Brenda, Betty, Lynda
Front Row : Michele, Theresa
In October, CinC sponsored a 2-day workshop on Threadpainting with Karla Spinks.


This is a thread-painted portrait of Scott Joplin made by Karla Spinks. His face is entirely made with free-motion embroidery, no computer required. His face is entirely covered with thread.


This is Karla Spinks, our instructor for the weekend workshops. She is showing the woodpecker she is working on. Karla has worked with textile artist, Hollis Chatelain.


Karla's woodpecker with inspiration photos and the background fabric she intends to use for the finished piece.


A detail shot of Karla's woodpecker.


The workshop began with Karla having us thread-paint already painted on fabric. In this sense, it's like coloring or painting with your sewing machine needle. In this step, we were warming up, getting used to free-motion embroidery, adding texture and mixing colors. None of us were absolute beginners to free-motion stitching, so we quickly moved on to the next step.


This is Michele's blue bird, cut out of the hoop and ready to appliqued to a background. This was not done with a computer, or an embroidery module on a fancy sewing machine. If you can lower your feed dogs and set your machine for free-motion, you can do this, too!
I used a photograph as a reference, and penciled in the basic outlines of the bird. Then I just filled in the colors. There are four layers that we're stitching on. From the ground up : stabilizer, buckram (as in book binding), sheer fabric, then the thread layer. The 3 layers are stabilized in the embroidery hoop, which makes it easy to move around under the needle.

More picture of thread painting. Lois brought in this gorgeous quilt based on McKenna Ryan Rhythm of the Sea pattern :


October 2010 Show and Share


Karen finished a beaded face.


Karen's bracelet is sitting atop a piece of Michele's rust- and overdyed fabric inspired by Turquoise.

Lynda's latest woven piece.


A sample of one of Sandy's tie bags, which she demonstrated how to make.

Friday, October 08, 2010

Sandy's Tie Purse


At the October Meeting, Sandy will demonstrate how to make a purse from a man's tie. If you want to sew along, bring the following :

Supplies:
1 wide necktie about 54 inches long. Small over-all design or solid tie works best. Stripes or large patterns cannot be matched easily. Directional patterns are also difficult to match, such as galloping horses, sailboats or golf bags.

1/4 yard of lining fabric
1/4 yard of muslin for interlining
1 1/4 yard of braid for strap
12 inches of 3/8" wide elastic

I will bring a template and you will need to cut 2 muslin pieces and 2 lining pieces. So bring a fabric scissors, rotary cutter, small cutting board.

Sewing machine and matching thread if you want to sew.

It takes a couple of hours to make one. I will demonstrate it and bring written directions. If you don't want to bring your sewing machine, I will show the steps/stages necessary.

**************************************************************
Edited after the fact :  This has been one of the most popular posts on this blog.  I get regular requests for the pattern.  Please don't ask : I don't have a pattern to share.  Someone else lead this session and  I just posted her words to the blog.  I don't have a pattern to send you.  And I'm no longer in touch with the person who led the session, either.  Sorry, I can't be of more help on this.  I'm sure if you play with it a bit, you can figure out your own patterns.  Be adventurous!   ;-)
-- Michele, CinC Blogger

Thursday, October 07, 2010

September 2010 Newsletter

SNIPPETS from Conversation in Cloth

Meetings are held on the last Thursday of the Month at the Menasha Public Library at 6:30 PM

September 30, 2010
Members Present: Sandy, Brenda, Betty, Karen, Michele, & Lois

Christmas Party Final Plans (Note Date change!!)
The annual White Elephant Holiday Party will be held at El Aztecca on December 16 at 6 PM. We changed the date so that those members who are also part of Sew Savvy can attend as well. Lois will make the arrangements so that we can have a table in a corner by ourselves. Please RSVP by November 30 to Lois at lwolfe@bayland.net.

El Azteca
201 W Northland Ave # D
Appleton, WI 54911-2600
(920) 996-0983

Karla Spinks Workshop
The Karla Spinks Workshop will be at Julie’s Sewing Center on October 16 and 17 from 9:30 Am to 4 PM. If you missed the registration and still want to attend, contact Lois Wolfe to see if there is still space available.

Call for Challenges!
Karen suggested that it was time for the group to get involved in another challenge. Lois and Karen discussed a challenge that they saw on display at the Madison Quilt Expo in which a piece of red cording was used as a continuous element throughout the entries. It was felt that we’d like to do something like this as we are all different yet ties together by our interests. We talked about using clothesline instead of red cording. Other ideas are very welcome. We’ll make a final decision on the challenge and deadlines ion October.

Should We Do a Show?????
Karen mentioned that it had been a long time since we had displayed our work as a group. The last time was at the Menasha Public Library quite a few years ago. We could approach the library again about doing something similar in their lobby cases or we could also ask the American National Bank if we could be a part of their arts series. WE discussed putting our challenge results into the show. Someone from the group needs to step forward to organize the show if we decide to go ahead. Again, we’ll discuss this in October and make a final decision.

Amazing Creations brought by our Artist Members
Check out http://conversations-in-cloth.blogspot.com/ for photos of everybody’s work.
Betty – brought a chenille purse and a fleece jacket that she had made. She intends to add beads which will really make it sparkle.
SANDY – wore a jacket that she made from a beach towel and matching fleece. Very colorful and innovative. It also looked warm. She brought photos of the bra that she submitted to the Casting for Recovery auction and directed us to a website of a woman who makes wonderful button necklaces. http://www.jillweisz.com/
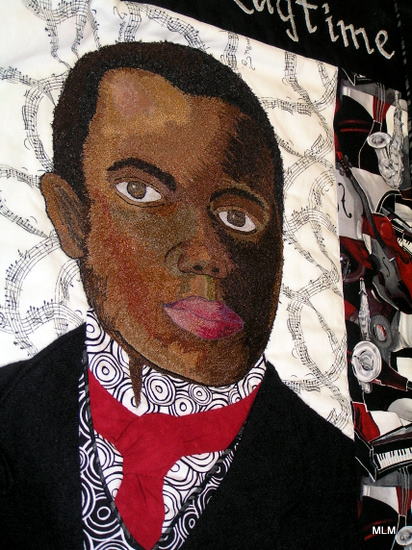
MICHELLE – displayed some amazing fabric portraits of her son Oliver, herself and a musician (sorry Michele I forget the name). She used the Art Quilting Series Project 406-2 at www.quiltingartstv.com to make a stylized portrait out of shades of one color of fabric. Way Cool! She also brought along a new book by Susan Carlson called “Serendipity Quilts” that show case Susan’s unique style.
LOIS/KAREN displayed the zipper pins that they had been experimenting with from directions Lois found on the internet.
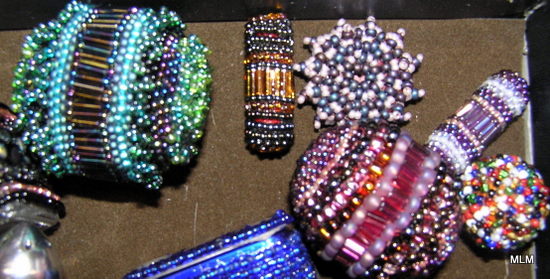
KAREN brought in the finished product from the dyed paper towel project that we did. Using mod podge, Karen applied the decorated paper towel to prepared canvasses. The 6 x 6 inch piece is one that will be brought back to the ART GARAGE in Green Bay for their “Art from the Heart” fundraiser. Anyone can participate by picking up a canvas at the Art Garage and adding a design to the face of the canvas. For more information go to http://www.theartgarage.org/ . Karen also brought in a necklace featuring a copper slag piece that she picked up this summer and a doll named “Roxanne” that she made at a class at Keep Me in Stitches Quilt Shop and her beaded face pin that she finished.

Treasurer’s Report
Lois intends to provide a regular Treasurer’s Report for you in the future. As of September 30, 2010 the cash balance is as follows:
Beginning Balance $173.28
Expenditures:  Postage stamps for Newsletters $ 8.50
Total $164.78
Revenue -0-
Grand Total $164.78

October 28 – Sandy will demonstrate how to make clutch purse or bag from a man’s tie. If you want to try making one that evening, bring a tie with an all-over design, sewing machine with thread to match, cording for the handle/strap, and a matching button.

Michele brought up the idea of using Facebook or Twitter as a means of staying in touch rather than the current blog system as very few people were using the blog. We can discuss this again in the future, but for right now, everyone wanted to stay with what we have.

2010 Future programs
December 16 – Annual White Elephant Holiday Party
January 27 – Karen will demonstrate how to get started on the beaded boxes (if the weather allows a trip from Green Bay to Menasha).
February 24 – Michelle will bring the Maria Elkins DVD and her samples so we can learn the portrait technique.
March - ???????

Saturday, October 02, 2010

Coiled Baskets from Cotton Clothesline : Demo by Lois


At the September meeting, Lois gave an excellent demostration on how to make coiled baskets from cotton clothesline wrapped with fabric strips.


This picture is looking down into a tote bag Lois made with a jelly roll set. Yummy!


Another basket on display. This one was made from a single fabric. The patterns made by wrapping the strips of fabric is mesmerizing!


More of the baskets on display.


Begin by cutting your fabric into 1/2-inch strips.
Alternatively, if you have jelly roll strips, cut them in half. These strips will be a little wider.

Cut the cord end at an angle, goob it with the glue stick.
Start wrapping the fabric strips around the cotton clothesline cord. Be aware of right and wrong sides to your fabric and what side you want to be showing. It's ok to overlap the wrappings, as you don't want any white clothesline to be showing.
Use a glue stick to secure it the fabric. Wrap as tightly as you can, and use the glue stick as needed to secure it. Keep whirling and twirling until you have a goodly amount to begin the coil.

Lois recommend using your sewing machine's presser foot to hold the end while you continue to wrap the cord. Secure it with a pin when you need to let go.


Start the coil. This may be the toughest part of the whole project.


When you have a few layers coiled, stitch an X across the bottom to secure it. This is a very important step. Don't skip it.


Continue coiling the wrapped cord, hold them tightly together and zig-zag the new round to the last round. Go SLOW.


To curve the bottom of the bowl, work from the inside and tip it slightly, as shown in the picture. It gets easier as you go along.


Wrap the cord, coil it, then stitch. Repeat until you're done.
This is Brenda getting a good start on her basket.

Other options for adding color :
Dye the clothesline (instead of wrapping it).

Resources :

Sue Breier's Books
It's a Wrap It's a Wrap II